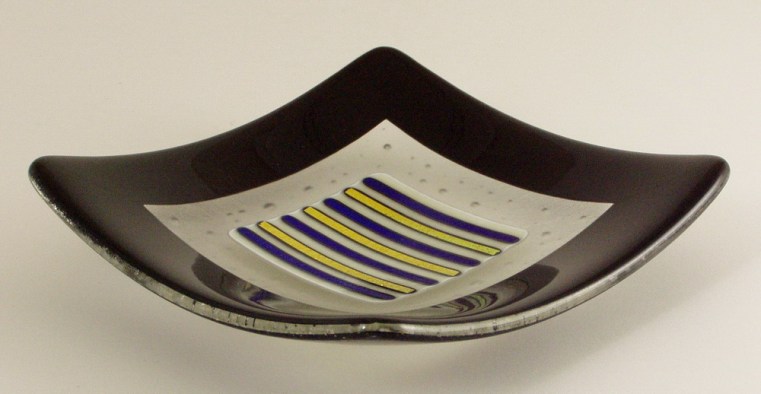
This glass bowl is very elegant. The strips of dichroic “Sizzle Stix” really sparkle in the sunlight.
I stacked two layers of clear Bullseye 90 on the bottom. I cut the black strips for the borders and then mitered each corner by grinding them at a 45 degree angle. I put these strips on top of the clear.
I previously fused the dichroic strips onto a square of French Vanilla Bullseye 90. I put this smaller square on top of the clear. After that, I flipped it face down to full fuse it and slumped it face up into a 9″ Ball mold to get this bowl shape.
I had a lot of fun making this glass bowl. I sold it at the Brookings Festival of the Arts, so I do need to make more. I think I will experiment with different colors of the dichroic Sizzle Stix and the color of the border.
Christine — Glass Artist

October 5, 2007 at 12:41 pm
I’m curious …. how did you get the “bubbles” into the French Vanilla square?
October 13, 2007 at 8:47 am
Hi Liquid Fire,
When you are asking about the bubbles, do you mean the bubbles in the clear glass around the French Vanilla square? If so, I didn’t do anything special to get those bubbles. I have been experimenting with different firing schedules to try to lessen the bubbles. With clear glass, bubbles are inevitable and add character to the piece … I think 🙂
I used a ramp speed of 600 degrees/hour from 1050 degrees to 1250 degrees for this glass bowl. If you want more/bigger bubbles, then you would need to ramp up faster from 1050 degrees to 1250 degrees. Don’t go too fast, but that is the zone in the firing when the bubbles form. If you go very slow through this range, then you will get less bubbles. You will need to experiment to get the look that you want.
I hope this helps! I’m certainly not an expert — I am explaining what things I have discovered.
Let me know if you have any more questions!
Thanks,
Christine
December 8, 2007 at 9:00 am
Hi
I am brand new to glass fusing> I just purchased a Paragon FireFly kiln and have no idea about ramp speeds. This is a manual kiln. I used to have an automatic larger kiln, but I had to sell it. Anyway, can someone give me a mini-tutorial in the exact process to get the kiln up to the point at which the glass will fuse?
I am also wanting to use PMC. Would the same instruction fit?
Thanks so much!
I’m glad I found your site!
December 11, 2007 at 8:56 am
Hi Susan,
I am not familiar with the Paragon FireFly kiln. Did it come with instructions? If not, go to Paragon’s website and see if they have any instructions.
I have not used PMC, so I don’t know the answer about the firing schedule.
Every kiln is different, so you have to experiment with it to see how yours works. Try http://www.bullseyeglass.com. They have a lot of resource information and one of them is “Getting to know your Kiln” (or something like that).
If you still need help with using your new kiln to fuse, send me an email and I can give you my firing schedule. You’ll have to tell me the size of your new kiln?
Christine
December 30, 2007 at 1:01 pm
I love this design! I’m still experimenting with fused glass and have only made a few larger pieces (the rest is small cabs to use in my jewelry designs)….I’m so envious of how “straight” your edges are! The few plates that I’ve created have all curved (a gentle C) on all sides…..they are only 2 layers??? does that make a difference??
Thanks so much for sharing!!
December 31, 2007 at 9:28 am
Hi Randi,
Thanks for your compliments! I love this bowl, too. However, someone bought it, so now I want to make another one!
Are you fusing with two layers of glass that are 3 mm thick (regular thickness of glass, not thin)? Glass wants to be 1/4″ (6 mm) thick when fusing. If you don’t have 1/4″ of glass, then the edges will pull in. If you have more than 1/4″ of glass, then the glass will puddle outward. I had three layers of 3 mm at the borders of this plate. I can’t remember if I ground the edges after fusing the glass. I probably needed to, since I used three layers of glass.
Does the curve appear when you are slumping the plate? If so, you may be slumping it too fast and/or too hot. This has happened to me several times.
I would need more information about your firing schedules to help you any more than this, since the curves can appear at several different points.
You can grind the edges straight, if the edges curve in during the fusing.
I hope this helps! If you still have questions, I’d be happy to help.
Christine